Showing posts with label Icing. Show all posts

Thursday, December 7, 2017

Swirly Snowflakes!


I have always liked the look of dark colours on shorties, so decided to go with this lightly shimmered navy on my newly shortened nails.  Here's what I came up with!


Started with a base of Icing My Date With A Royal; this is three thin coats.  The polish is fairly thin and it took the three coats for good coverage.


Topped with KBShimmer Clearly on Top.


Stamped using an image from Ejiubas EJB-03 with FunkyFingers Gesso.  (Please excuse the tip of the nail on the index; the capful of acetone that I use for cleanup spilled all over my nails and the index finger took the worst hit; just mangled up the stamping at the tip of the index mainly.)


Topped with KBShimmer Clearly on Top to finish.


Thanks for looking!

Sunday, December 3, 2017

Icing All That Glitters Is Green


I'm having a lazy day around the house today; just about to make Rice Krispie squares, then go decorate the Christmas tree.  I was shopping my stash not too long ago and seen this cool green polish I decided to use for a quick and easy mani!  Here's what I came up with!


Started with a base of two coats of Icing All That Glitters is Green, no top coat. I'm not sure why they named it that...I don't see any glitter!  Maybe they mistaken that shimmer for glitter?  Anyway, nice polish though!


Top coated with KBShimmer Clearly on Top.


Stamped using Mdu 65 using an image from Marianne Nails n.56.  This is one of my favourite things to do when stamping; taking an image then stamping different parts of it on each nail for a little variety.  I really like this green on green top; I know too often that I reach for black and white stamping polish so like the use of some coloured stamping!


Topped with KBShimmer Clearly on Top to finish.


Hope you're having a great weekend; thanks for looking!

Saturday, February 8, 2014

Funky Valentine's Day Nails

This is another one of those nontraditional themed mani's I like to do every so often; a Valentine's Day mani that's a little on the different side!


I wanted a mani with bright, bold colours and all random.  After applying one coat of OPI My Boyfriend Scales Walls, sponged using an assortment of colours.  Polishes used were China Glaze Happy Go Lucky (yellow), Sally Hansen Insta-dri Heat Flash (orange), China Glaze Starboard (green), Icing Fifi (pink) and Essie Avenue Maintain (blue).  The sponging didn't turn out as bold and bright as I was looking for but didn't mind it never the less.


Stamped using FUN black stamping polish using Cheeky Jumbo 6, Happy Holidays.  


This is a lot of black to clean up...which is why I used FUN stamping polish for the mani versus the harder to clean up Konad.  This is a pix after clean up!  


Topped with SV to finish.


I did skittles in the same colours on my other hand but no sponging...I actually really liked how it turned out too!  It had more of the bright, boldness I was looking for...but wasn't too thrilled with my recent nail break on the middle finger and the subsequent shortening of the rest a bit to somewhat match...it's growing out slowly, but surely!  Yes, I walk around with mismatching nails and nail lengths....all the time in fact!


Have a fantastic weekend....thanks for looking!


Tuesday, April 30, 2013

Blue Awareness Ribbons

Here's the last of the wear blue in support of Autism Awareness mani's for the month of April.   I've been saving this one for the very last as it was one of my favourites.

Started with a base of one coat of American Apparel American Denim, no top coat (index has two coats only because I nicked it). 

For the gradient at the tips, added a coat of Icing Starlight.  Starlight is lightly tinted which was a bonus as it added nicely to the gradient.

Added a layer of Icing All Night Long at the tips.

Stamped using white Konad special polish using BM321 with an accent of BM324.  I'll be very honest; I had wanted to do the image on the accent on all the fingers, but I didn't think I'd be able to line them up well as french tipped images are my nemesis!  When I did the accent first and it turned out OK, I thought I had better not press my luck so decided on the larger full size ribbon for the majority of the fingers or risk wrecking them all! 

I usually don't do my mani's facing towards me, but had to do it because of the way the accent stamped.  So I took a few pix so they weren't upside down!

I was really surprised that no Autism Awareness puzzle ribbon exists; I made a note of it in my ongoing list of image wants and hopefully one of the plate makers will add an puzzle ribbon image in the future. 

Topped with SV to finish.


I hope that there wasn't too much blue for the month; I tried to vary the blues up a bit...and even though I thought I shared a fair number of blues during the course of the month.....there are oh, so many more blue polishes in my stash that I never used ...I didn't even get all the finished blue mani's posted that I wore .....another time for sure!

Thanks for looking!


Tuesday, August 14, 2012

Are You Tired of Layered Mani's Yet?

I'm not going to talk about doing layering experiments anymore....but I will be posting a few more layering-with-glitter-then-stamped mani's in the future!   Right now I'm doing more layering because there are so many cool indy glitters I've loving at the moment...yet, can't stop stamping 99.9% of all mani's I wear...so I'm trying to live in the best of both worlds!  Anyway, here's another layering mani I came up with not too long ago.


Started with a base of two coats of Icing I Like the Nightlife that I picked up at Icing recently.  It dries on the matte side...but that's OK as its easier to see the glitter interest shine through!  This has no topcoat.  I think this is a cool polish....don't have anything like it in my stash and it's beautiful IMHO!  If you're a blue fan, you'll need to run to your local Icing store and pick up a bottle before they're all gone!


Speaking of indy glitters I'm loving at the moment, added a coat of Girly Bits Wet Bikini and topped with SV.


Stamped using FUN Bubble Blue using QA 16. 


While I initially had plans to do a different accent nail for this mani, I decided to do all the same for some simple stamping as I thought the layering had interest enough in the mani.


Topped with SV.


This is probably one of my favourite mani's I've done in a while.  Simple, but interesting.


Please check out the tab at the top of my homepage if you are interested in knowing where online to get QA stamping plates, Girly Bits polish or FUN stamping polish. 

Thanks for looking!

Thursday, August 9, 2012

Squiggly Lines

This mani is a little different than what I usually do but did this as part of my ongoing quest to experiment more with layering and stamping.....anyway; here's what I came up with.


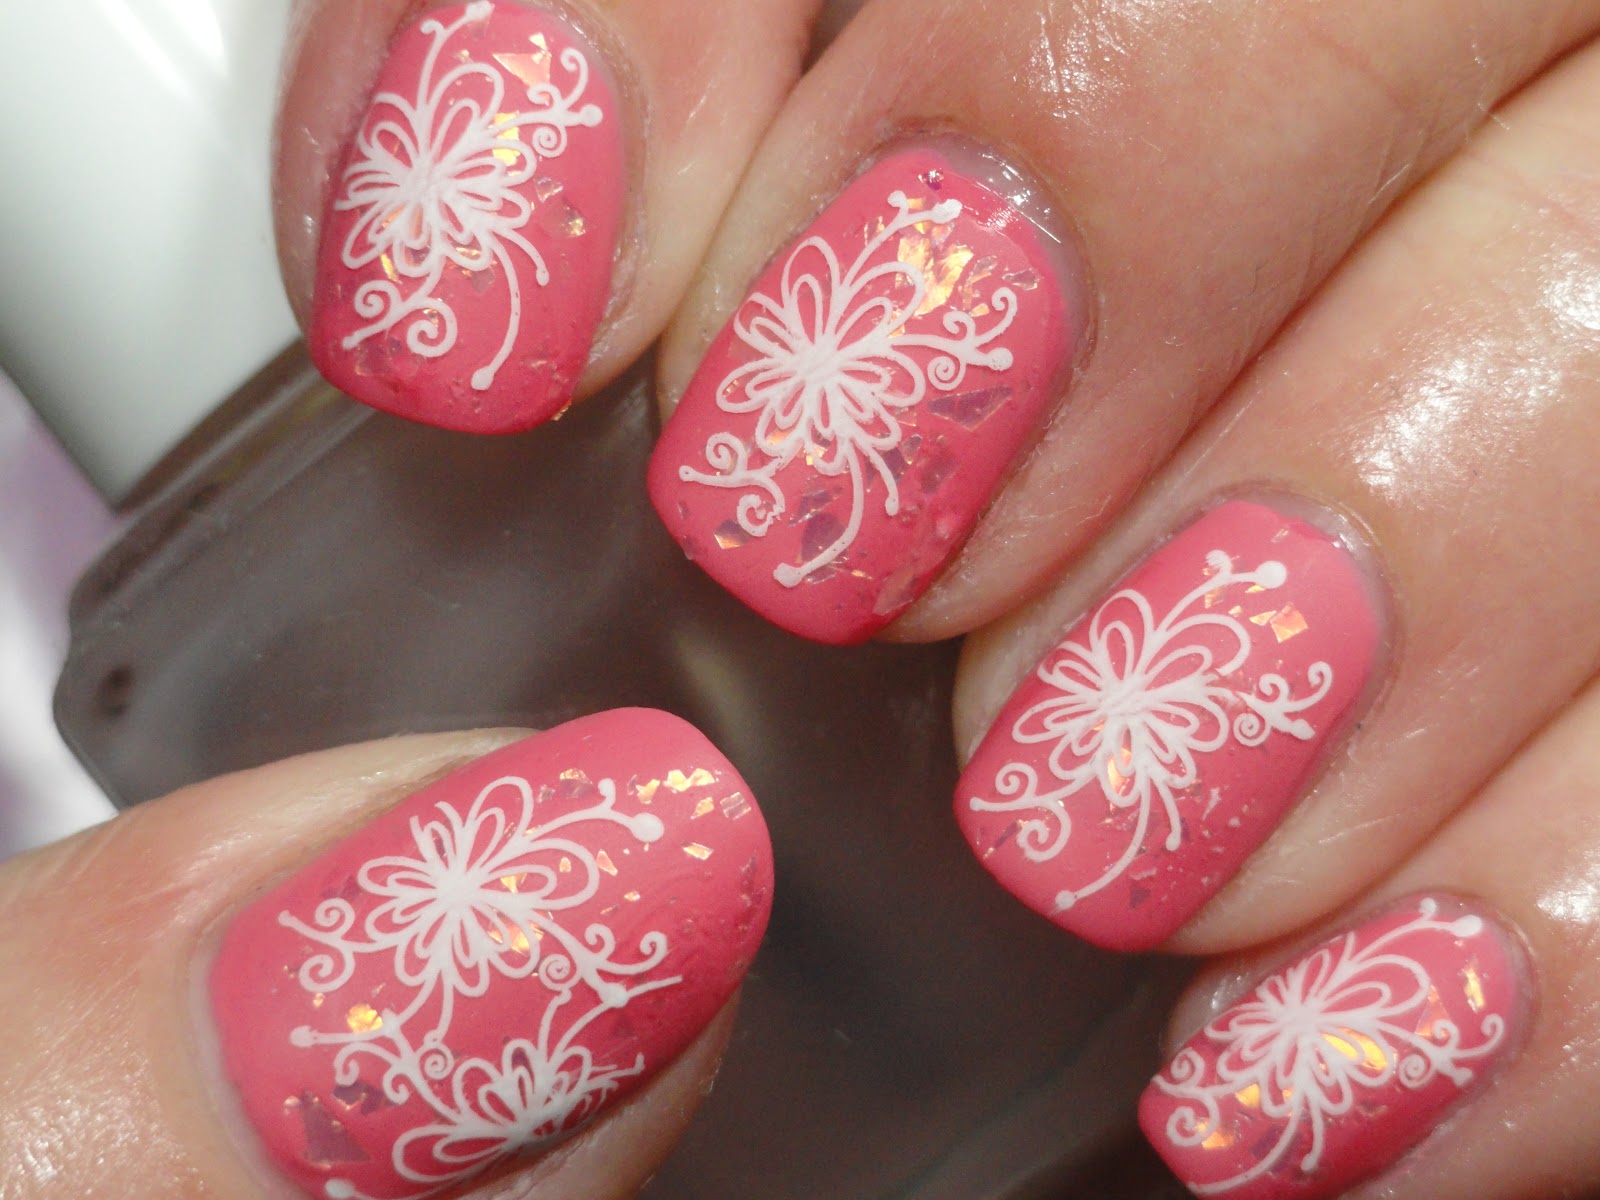
Started with two coats of Magnetic Largo Lilac; this is with no topcoat.  Application was good and it covered nicely in two coats which really surprised me as it is such a pale colour.


Magnetic Largo Lilac is one of three polishes in a boxed set called Florida Moods.  They are a trio of pretty, delicate colours.  However, as I'm experimenting more and more with layering for different looks and how they stamp, I decided to layer some glitter on top; after checking out my stash, decided on Icing Glitteratti.


Loved how this layering turned out...makes me wonder why I had never reached for Icing Glitteratti in the past!  Holo!...Glitter!...what's not to love? These two colours seem made for one another! 


Even though I loved how the layering turned out, rarely does a mani go by that I don't end up putting on some type of stamping...and again, am experimenting more with layering of polishes and stamping, so when I was searching for images, I seen the squiggly lines on MJ II and thought it would be a good image to still see the base and glitter beneath. The only problem was trying to figure out what stamping polish to use.  I decided upon Konad Red Wine, which is a little odd choice, but it didn't turn out too bad.


I did want to point out that IRL, this polish stamped a deep purple and complimented the base and glitter well....as least I thought so!  However, under the glare of the lights for the photo, it does have a reddish tinge...it is called wine after all! lol!  But I don't think it was this bright IRL.  None the less, I didn't mind it and as I say so often, thank goodness its just polish and can easily be removed anyway!  In hindsight, there are dark purple cremes that may have stamped well that I could have used....maybe next time!


Thank you to Nadia at Magnetic Canada** for sending this polish along with my order of Magnetic Freakin' Violet.  One of these days, I'll get around to showing Magnetic Freakin' Violet...it is freakin' amazing! 

Hope you're having a fantastic day...thanks for looking!

**This polish was sent to me for review.  Please see my disclosure policy for further information.

Wednesday, July 11, 2012

Konad Basic Kit + CND Shellac Giveaway

I was contacted by Nail Polish Canada and asked if I'd be interested in doing a review on the Konad Basic Stamping Kit.  I haven't been using Konad image plates too much as there are so many plate options out there now...unlike when I first got into stamping a few years ago.  But it was nice to get back to my stamping 'roots' as Konad products are what originally turned me onto stamping.  I still remember the amazement I had the first time I seen a Konad display at a local home show....I thought it was one of those home show products that work at the show, but won't when you get them home, if you know what I mean. While I was fascinated, I wouldn't even consider it until I did my own nails at the booth.  But I did, and before I knew it, I had a cool butterfly design on my nails!  Then I hung around the display for around an hour (not kidding...with DH in the car waiting for me!) and watched how easy it was for the gals in the booth to put it on nails.  I was fascinated, but heming and hawing about whether I trusted the product and whether or not I wanted to spend so much money for something I wasn't even sure I would use on a regular basis...and especially cautious because the prices of the plates and polishes were between $10-$15. Yes...not like the prices we see nowadays!  I seen salon owners pick up kits and talking amoungst themselves how the nail art will increase their sales as well as seen a lot of ladies of all ages who were just like me.....wanted to add a little decoration to their nails!  But I did buy the products...and the rest is history!  I was hooked on stamping!

If you are like I was and can't decide if stamping is for you and don't want to invest in a big kit, the Konad Basic Kit is great to get you started.  This is the mani I came up with using it.


Started with a base of Icing Rosie Posies, two coats.  This has no topcoat.


Added a coat of Icing Rave Royalty. 


Stamped with m36 using white Konad special polish, both of which are included in the kit.


Unfortunately, didn't line up the thumb image terribly well, so added a second image to cover the bare spot!


I thought it would be cool to matte the flaky so added a coat of Essie Matte About You...which I thought was kinda cool!


This is the Konad Stamping kit as it was sent to me. 


This is a great kit if you are considering stamping as it has all the supplies you'll need to determine if stamping is something you're into...or not!  But I can tell you now that in no time, you'll be hooked!  I know I was...and still am! 


I did another mani using this plate too...I'll show you how it turned out in my next post!

For all of you how aren't into changing your polish everyday (lalalalala....I can't hear you!! lol!), Nail Polish Canada is also offering a giveaway for a lifetime supply of CND Shellac......all you have to do is say why winning will change your life!  Open to residents of Canada and US....if you'd like to check it out, please go here!

 Thanks for looking!


Saturday, March 17, 2012

Happy St. Patrick's Day!!!

Top o' the mornin' to ya!

This is the last St. Patrick's Day mani I'm going to share until next year!


Started with a base of Zoya Veruschka.


Added Icing Evergreen to start a gradient.


Then Midie No. 4, which is a lighter green glitter with various sizes of glitter versus the fine, darker glitter of Evergreen.


Here's a bottle shot of Midie No. 4. I'm glad I stumbled across these at a little shop not too far from my house....pretty, but they are certainly on the smelly side.


Stamped using CND Gold Chrome using the various size of clovers on XL F and BM03 for the accent middle finger. (It seems I forgot to upload a pix of the mani at this point and I've already deleted the pix from my camera so no shot of the mani in progress here!)

With all this glitter action, I knew I had to matte this mani...so a coat of Essie Matte About You was added.


Then I remembered how chippy matte mani's are.....so added a topcoat of SV. This is how I wore my nails when I was out and about...but I much prefer the matte look.


Have a fantastic St. Patrick's Day! Thanks for looking!