Monday, January 16, 2012

Hey Canucks...Have You Been By Winners Lately?

Since maybe October or so, Winners has really stepped up their game and started carrying some brands that are harder to find for us Canadians...at least in my neck of the woods! Barielle, Color Club, Duri, Cosmetic Arts, just to name a few. Some gals reported seeing Nubars at their local store, but when I went looking for them, I wasn't able to find any (not recently...seen random bottles maybe a year ago or so).

Here's a few of the things I've bought in the last month or so...not all the same time and not all the same location.


The only tip I have is if you want it, pick it up the first time you see it. Don't be like me...I seen one of the Art Club sets at one store on on December 23rd and passed-they had three of them and I wasn't sure if I reallllyyyy wanted them. I ultimately decided I did; went back on December 26th and they were all gone! I was able to find them at another location after. The crazy thing about Winners is that not every location carries all the products (which was a plus on the other hand because I found some sets at one location and others at another...I guess they spread the love around) and quantities are usually limited! And they do add new stock every couple weeks, so I try to visit at least one store on a regular basis to see if there's anything new and exciting...if I do find something, then I go check out a couple more stores if I have time.

I only hope this continues...I remember seeing lots of polish last October but quantities dribbled down after Christmas...I do hope they keep their stocks up all year round!

Edit: I was wondering if there's any interest in these type of posts?

While this is more of an FYI Canadians; look what you can get type of post, I do remember that when I did my birthday giveaway questionnaire, there was a few responses that had requested seeing hauls and the like. I've always avoided these type of posts (mainly too embarrassed to admit freely to the world the amount of polish I buy!) but I don't mind sharing if there's interest. And if not, that's OK too...not like I'm going to stopping doing my nails any time soon...or hope I'm not!

Please let me know your thoughts!

Thursday, January 12, 2012

Orly Nite Owl

This is another one of those mani's I did with veryyyyy short nails. I was pretty pleased how it turned out considering there isn't a whole lot of nail to stamp! lol!


Started with Orly Nite Owl as the base, two coats. This is such a beautiful polish that I haven't seen a lot of love for in the blogesphere for some reason.....a neutral with an edge!...maybe because it was released in the same collex as Orly Fowl Play which seemed to get all the attention! The shimmer is so what I seem to be into lately.


Stamped using QA 7. I've numbered the images on the plate I used for the mani for reference.

Photobucket

Used Konad black special polish using Image #1 on most of the nails and Image #2 on accent ring finger. I actually didn't do too bad lining up the tips for once! Yeah me! Not perfect, but decent! Unfortunately, the little dip in the centre of the tipped image accentuates any lining up errors. Oh well....not perfect but better than I've done in the past.


The above look was actually what I had planned in my mind when I started the mani...I was kinda going for 'simple elegance'. But then I got to looking at it and in my mind, it seemed more simple then elegant..... even plain. So added more stamping using Image #2 on the thumb and ring finger, the small flower on Image #3 on pointer, and the large flower on Image #3 on pinky with Konad white special polish.


This is more like it! But ultimately, I decided to add some accent stamping on top of the white on the thumb and middle finger using the small flower on Image #3 on the middle finger and the large flower on Image #3 on the thumb using black Konad special polish.


Waited a few minutes, added a coat of SV. The topcoat just really makes the stamping polishes pop as I've said before, especially the black, if you compare the ring finger on the pix above with the pix below.


I was pretty pleased with how this turned out...this was some pretty cool stamping (to me anyway!) on my nubby nails. But looking at these pix, I seriously need to work on my cleanup....black Konad is the worst to clean up!

Thanks for looking!

Wednesday, January 11, 2012

2 for 1!

As I do my nails nearly every day...I'm guessing around five days a week on average... but don't post nearly that often, I have a lot of manis in archives. And because my blog was started as my reference of manis I've done, I decided I need to kick my butt into gear and get some of them posted before I have something nasty happen like a computer breakdown (*shudder*) or I lose my SD card or something......(knock on wood)!!

So this is the first of my 2 for 1 postings....two mani's; one post. These two mani's were the first I did after I cut my nails down on New Year's Day.


First was OPI Fly from the Nicki Minaj collection. I seen a full display of these at Trade Secrets when I was out finishing my Christmas shopping the week before Christmas, but because I wasn't entirely finished my shopping for my kids, I passed on them to make sure I wasn't spending on me before I had whatever it was I wanted to get for them (always put your kids first over polish!). (And some gal in the GTA will be very happy I had spotted them! While I was browsing at a store in the mall, some fella came in asking about the collex for his girlfriend as a Christmas gift....this particular store didn't have them for sale; however, I overheard the conversation and directed the fella to where I had seen the full display only hours before! Hopefully he was able to pick them up for her!)


So when I had some time (and money!) to go shopping the week after Christmas, I thought I'd revisit Trade Secrets to pick up them up. But by this time, every Trade Secrets in my area was sold out of them...any of the colours I was looking for anyway! So I was surprised to see them at my local nail/beauty supply place on December 31. I learned my lesson and picked them up while I could. The colour I wanted to try first was Fly.

I then decided to add Lynnderella's Connect the Dots. You don't so much as apply it as dab it on here and there....me anyway! I just find I'm able to control a little better where the glitter ends up when I dab it and move it around.

As soon as I was done, I thought this mani looked awfully familiar...then remembered this was pretty much the same mani as my first time using CtD's...except base was Sally Hansen The Real Teal....oops!


The Real Teal has this gorgeous shimmer that Fly does not have and they are clearly different shades; however, because CtDs HAS the shimmer, they look mighty close when layered...not dupes but close. This was hilarious to me because when I was thinking about it, I have a large stash with so many untrieds which means I could try out some cool layering combinations...and then I go ahead and do almost the same mani as I've done before using CtD's not terribly long ago...I guess I just can't get enough of the teal and CtD combo! LOL!! Anyway, I do love this combo and this was one rare mani that I wore for more than a day.

After I removed CtD's, this was my next mani...again using Lynnderella's.


Started with a base of two coats of Misa Working Hard or Hardly Working.


Layered with one coat of Nubar White Polka Dots.


Lastly added Lynnderella Lucky Numbers. Again, not by applying a coat but more like dabbed it here and there to try to even out the glitter placement over the whole nail like CtD application. I'm not sure how much my pix show this, but while Connect the Dots has awesome white shimmer, Lucky Numbers has the same but in red....LOVE! I'm getting more into this shimmer type of finish...beautiful!


I'm going to try to post more of these 2 for 1 mani postings occasionally until I get relatively caught up in my postings....of course, if I posted more frequently, this won't be necessary...I'll see how it goes!

Thanks for looking!

Sunday, January 8, 2012

Happy Birthday, Dad!

Today is my Dad's birthday....he shares the birth date of this famous fellow....


Elvis!

I did this mani last night because I knew I'd be visiting with my dad this afternoon and Elvis is one of his all time favourite artists. My dad thought the mani was very cool!

Started with a base of OPI Bride's Bouquet (white); accent is OPI Yoga-
to Get This Blue; two coats of each. Topped with SV. No picture of just base polishes as I've used Bride's Bouquet and shown it a lot and the next pix shows the accent blue well. Stamped using Konad black special polish using FAB II (Elvis head), Konad m58 (guitar), SdP D-11 (boots and cowboy hat) and BM 08 (crown on pinky).


Then added full finger image plate on accent finger using plate FAB IV with Konad white special polish. My FAB UR NAILS plates arrived late last week and it was great that I was able to use a couple of them for this mani!


Stamped a few accents using Konad red and royal purple special polishes. Image plates used were Hot Topic (skull music notes), SdP C-12 (small and medium size crowns from the image) and Konad m73 (music above cowboy hat and above). I had stamping fail here as only half the lines under the stars went on the nail...this was because I took too long in trying to position the stamp on my nails and the polish dried up. Oops! In this case, the only way I probably could have corrected it would be to remove all the stamped images because those lines are on top of Elvis' head and I doubt I could remove the stars and lines without disturbing the head image...but ultimately decided it didn't look too terribly bad so just left it. Lastly, topped with coat of SV.


Happy Birthday, Dad!

Hope you had a great weekend...and thanks for looking!

Friday, January 6, 2012

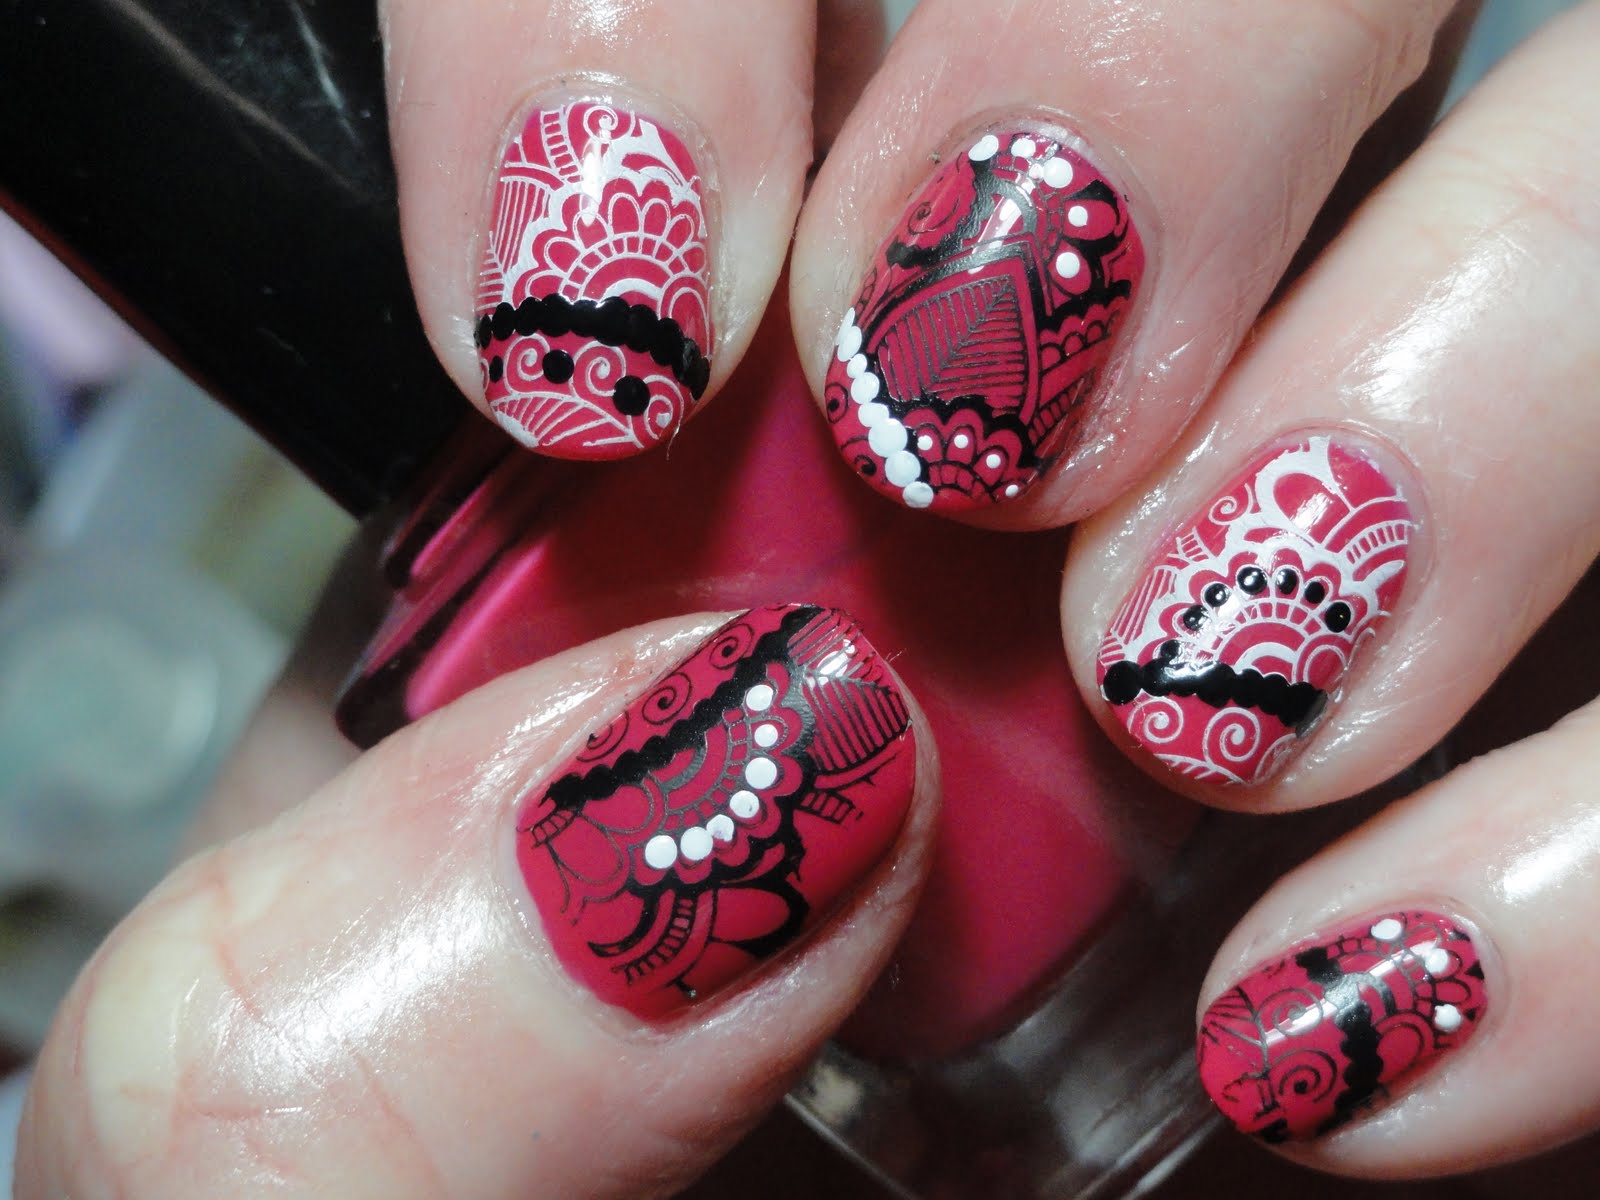
Barielle Now That's Hot!

This post is going to be a mish mash of things...this wasn't the mani or type of post I planned on posting next (or ever to be honest!) but Fingers commented on my last mani about how do I get the white Konad stamping polish to not smear and pondered if perhaps I post the pix I take before top coating my mani. I did reply to her but this mani/post may perhaps demonstrate it better in more detail (ie ramble!) with other comments and suggestions thrown in for good measure!

First of all, a few of my goals aren't going as planned. My first day back to work after the long weekend (Jan 3rd) was a 13 hour day due to having to stay late to handle an emergency. So much for less working. Last night, I went to bed at 2:40 am...so much for getting more sleep. As I type this, my lunch is leftover scalloped potatoes with a healthy helping of butter...so much for eating healthier! And well, this post is probably going to be long with a lot of pix...so much for shorter posts and less rambling! The great thing is that I have goals....which can be worked upon!

Winners has been a great source of polishes lately. One of my purchases just before Christmas was Barielle That's Hot Pink. This is the mani I came up with using it.


Started with two coats. I really liked the application of this polish...the smaller size brush was easier to apply on my small nails and while the polish seemed a little runnier to apply than a lot of other brands, this is actually my personal preference as I find I put less on the brush and then seem to apply it better...plus any cleanup is easier to remove as the polish is a little thinner.


Stamped using plate Big SdP J with black and white Konad special polishes on alternating fingers. I purposely tried to position the stamped image different on each finger for interest.


Now (and here's some rambling!) its probably evident that my fingernails are considerably shorter than my last few posts. I cut them down a few days ago because my middle finger kinda was growing funny. I filed it to try to fix or save it but then, it looked even funnier so I thought better cut them down so they can grow out. Well, these are my version of nubs! My nails even look kinda funny to me as they seem so short! But being the kinda gal I am, I couldn't resist still layering and stamping even with my nubby nails so I've still been doing lots of mani's with my nubs. And because this blog is about my nails, fails or not, with a little length or nubs! I did think about not posting them as I do still have lots of pix in archives and they probably won't take terribly long to grow out, but then I thought why not post some nubs with cool stamping (well, what I think is cool anyway!...this may not be the general consensus!! lol!) to highlight that you don't need really long nails to do some cool 'nadding and short nails are just as great! I personally know that I have specific image plates and themed mani's planned for when my nails are shorter as some of the full size images don't fit my nails when they are longer. I also think some stamped images just look nicer on shorter nails...just my opinion!

Anyway, after stamping the base, I used Konad black special polish and went over the white band of dots in the stamped image with black for a contrasted band look.


Then, went over one band of the stamped black dots with white Konad special polish. Also added more dots for interest, again using black and white Konad special polish.


Fingers...pay attention here! I've had my share of fails with white Konad special polish (well, if I'm honest, more than stamping polishes!!) and there are still lots of times when I get stamping polish drag when I apply my topcoat. Another problem I've encountered with white stamping polish (actually it will happen with regular polish too) is that if you apply SV topcoat while it is still kinda wet, the polish disperses and kinda fades so its not a crisp, clear stamped image. An example of this is my "Moves Like Jagger' mani and the white Konad special polish used on the pinky finger for the skull music notes. Before I put SV on, the white stamping was crisp and clear as a bell. As you can tell in those pix, when I top coated it with SV, the white stamping polish dispersed and as a result, the stamped skulls are not as clear. It was because of this mani that I started to make sure I take pix of my finished mani's before top coating, just in case it happened again. But I did find that if you wait a little longer for the polish to dry, whether its stamping polish or regular polish used for some dots, the polish does not disperse or smear when you put SV on it. Waiting this extra time is also key if doing any kinda of dotting work...I find the little blobs of polish does take a while longer to dry and again will smear if topcoat is put on too early. I've learned the hard way what happens with dots if topcoat is applied too early...they smear! So dear Fingers...time is the answer! Drying time of the stamping polish seems to be key...you will just have to learn like I did...there are some times that I can immediately go over a mani with SV right after stamping...there are others that I can tell that the stamping polish is a little thicker or wet, or the dots are wet, so I wait a few minutes (maybe 5 minutes?) then apply SV. I know this goes against the grain of applying SV on wet nails, but so far, it seems to work. I sometimes have a little SV shrinkage, but after reading lots of tips, have found that wrapping tips with base coat and wrapping tips with SV during both applications of SV (over base coat and over stamped image) 99% of the time eliminates shrinkage problems. I find that Konad white and black special polishes are the most finicky for drag or smearing...but I've also used WnW black creme and Essence's brand of black stamping polishes and they all smear. (This was through my phase when I was sampling different options for black stamping polishes as the clean up using Konad black special polish is a pain...but my personal preference is Konad as I find it stamps the crispest and darkest.)

When I first started stamping, I swore by Konad's topcoat. But I found I had a lot of smearing or drag of the stamping polish when it was applied. So for a little spell (before I started blogging...you won't see any pix of this), I just left my mani's without topcoat as I had smearing so often. But it bugged me that my mani's didn't have that crisp, clear stamped image that can only be achieved with a topcoat. This was around the time I turned to the internet to look into Konad more; when I googled it, I found all these awesome blogs out there with stamping! I did a lot of checking out of blogs and reading to see what others were doing and one tip that I read time and time again was to only swipe your topcoat lightly once over the image. Swipe and apply with one sweep. So I started to do this. But quite frankly, if the stamping polish underneath isn't dry, it still smears or drags one swipe or not...and too much of a blob or a heavy coat of the topcoat causes bleeding or blurring of the stamped image (I know from experience!). At some point, I read about Seche Vite (SV), and while I have love and hate issues with it too, I've found that a new or well thinned bottle of SV seems to work the best for me. For not only top coating my base polish before stamping but also applied as final topcoat over stamping. The other thing I've found is that if you wait long enough for the stamped imaging (or dots) to dry, you can go over the image more than once without it smearing or dragging. This is handy if you have a little too much SV on your brush and you need to go over the SV more than once so you don't have a big blob on your nail, or if you have bubbles (I find I can sometimes swipe them away)or if you have a spot you missed and even need to go over that general area again. I've even found that with a little practise, I can swipe away a little bit of a stamping polish drag by kinda going over the SV in the opposite direction (across the nail) with the SV brush without any on it. I've even waited for SV to dry after a polish drag, took out a clean up brush and removed the drag with acetone and then reapplied SV again (I'm getting better at this...sometimes its still a fail...see my recent birthday mani and you can still see some smudging on the thumb under where it says Happy Birthday, but I've since done it and it has worked better).

Another comment that I have about applying SV on top of your base coat before stamping is that in the event that you make an error, most of the time, you can lightly swipe a dampened cotton pad with acetone over the stamped image and remove the stamped image without effecting the base coat underneath. But use a light hand...and don't double swipe the same area using the same cotton pad if there is some residue on the nail; use a clean portion of the pad. Hand sanitizer with rubbing alcohol also removes image (but I've found the odd time that it removes the base polish more than acetone so I've switched back to acetone with a light hand). It doesn't matter if the stamping polish is wet or dry; the acetone will still work...just use a light hand with your swiping.

I personally find that black Konad polish drags more than white, but have had issues lots of time with white. I had the weirdest thing happen with Konad white back when I first started my blog....it literally changed from white to another colour in front of my eyes. I'm not sure what ever caused it...if it was a base reaction or SV or what. You can see this here. I'm pretty sure it had something to do with the Misa base...I haven't had this happen since this last post...but it was like magic...white to green in seconds...I also had it happen before this post when it changed to purple but I can't seem to readily find the post right now.

After waiting for dots and stamping polish to dry, applied SV.


You should be able to see here the difference with SV on top of the stamped image and without...just in case, Fingers, you wonder if my pix are taken before topcoat. Most of my posts are kinda like tutorials (well, in my mind anyway that how I post them!), so I usually have a finished mani, then the base, then mani in progress, then finished product and sometimes a second pix with SV on top...I'm not a betting gal, but I'd say at least 95% of my posts show at least one pix with the stamped image topcoated...in fact, I comment on it occasionally how the topcoat makes the stamped image *pop*. Topcoat is also a great way to even out dots as my dots look like pimples a lot of the time...it smooths them out so my mani's are pimple free!

Another reason I do my posts like this as I remember just getting into stamping and trying to figure out how gals did their mani when I was surfing blogs. So I try to post pix step by step versus just one of the finished product. I also recall reading that they used a particular plate as it was indicated but didn't know which image was on which plate...which is why I try to say x image is from x plate, etc etc...unless its only one or two images/plates...or I forget, which it probably is the case most often! But I do try because I remember driving myself crazy looking for specific images and trying to figure out what plate they used! I thought if I look for this info, maybe someone checking out my blog may be looking for the same info..maybe? And don't get me started how crazy I used to go when a blogger just posted a mani and had no reference of the plate used or the stamping polish...which I still see on blogs now! Thank goodness I'm more versed with image plates so I usually have a good idea of which plate/brand it is...but this literally drove me nuts when I first got into stamping! And still does sometimes if I don't recognize an image now and then!

I cut and pasted a bit of the images above for a better comparison of mani before topcoat and after. (ughhh....not that I want to supersize my cleanup skills or poor cuticles, but for the interest of comparison of mani with and without topcoat....)

This image is without topcoat.
Photobucket

This image is with topcoat.
Photobucket

The other thing that I want to stress is that this is how I stamp and what I've found works for me but no means does it mean that other polishes, basecoats or methods won't work better........ I know others find other topcoats work better and lots of people use WnW black creme for black stamping polish...I've used it too, its just my preference is Konad. The odd time, I try out other quick dry topcoats just to see if I'd be liking anything better too. I have them all (Sally Hansen in the red bottle, Deborah Lippmann, Posh, Essie, Orly...probably more)...just find the SV works best for me. I usually indicate in my posts if I've deviated from using SV (odd time use a non-quick dry topcoat especially if using a holo polish) or if I only put one coat of polish on, or four, which happens sometimes. And by no means am I a polish guru or know everything about stamping...there are bloggers out there that stamp way better than me and with far more knowledge about polishes, bases, cuticle care, stamping etc etc...and I still am working on my issues like clean up and super dry cuticles so always am scouring posts looking for tips! Heck, I still have lots of stamping fails (even this mani, I can see some where I didn't get the stamped image 100% on the nail)...but the great thing about polish or stamping fails.....it's just polish...easy enough to remove and redo with a bit of remover and a bit of time!

I'm sorry to have rambled so much...but hopefully this will demonstrate to Fingers how I do white and black stamping without getting it to smear...and well, anyone else that this may help out too!!

Thanks for looking!

Tuesday, January 3, 2012

Is it Spring Yet?

Not that I'm complaining about the weather we've been having!! Really, winter has barely arrived in our area....a little snow but hardly anything significant....and fairly mild temperatures except the last couple of days. But after doing so many Christmas mani's...and then a few on the darker side (for me!), I was in the mood for something a little lighter and brighter...more appropriate for spring not winter...this is what I came up with.


Started with two coats of Zoya Robyn.


Stamped with Konad white special polish using Big SdP M.


Lastly, added a few random dots in OPI Banana Bandana and Elephantastic Pink.


I hope everyone had a fantastic New Year's! Did you make any resolutions? I have a few goals...polish and non-polish related:

Polish:

* reorganize my polish area (started but not finished)
* do polish spreadsheet
* organize a blog sale
* eliminate number of untrieds
* only buy the polishes I love...not for the sake of having the whole collection
* more swapping....reduce stash and save cash! (um...maybe this won't reduce stash)
* more frequent blog posts
* moisture my cuticles more often
* better polish clean up
* organize blog/get better banner/wallpaper
* shorter posts/less rambling
* don't take 87455907 pictures of mani's...cuts into my sleeping time and they aren't all that different anyway
* look into a way to have more colour accurate or polish finish accurate pix...it is terribly annoying to have a gorgeous polish or layering combo that just doesn't translate well in the pix, or if the colour is not true to life. Better lighting or camera...or figure out how to use camera ....


Personal

* exercise more (who am I kidding...just get exercise!!)
* eat healthier
* work less
* have more family/me time (will only happen if I work less!)
* save/plan for retirement
* connect with friends and family more often (see number three)
* take family on out of country vacation
* look into buying pop up travel trailer; take kids to see more of the beauty of Canada versus what we have here in Ontario (which is pretty cool...but want them to see Bay of Fundy, the Rockies, plus lots of places in Ontario we've never been!)
* get more sleep (see number three)
* try a new restaurant at least once every couple months
* less volunteering of my time during the summer...so can relax and spend more time with family
* take at least two weeks of vacation (um...workaholic here...have lots of vacation time but rarely take any...usually only a few days or week)
* declutter house

I'll have to remember to come back to this post to see how many of these goals I've accomplished!

Have a great 2012!

Saturday, December 31, 2011

Happy New Year's Eve!!

This is my New Year's Eve mani.


Wayyyy more exciting than my plans...sitting home with the hubs watching tv.

Started with two coats of Wet n Wild Black Creme. One coat is pretty opaque but I find for me that two evens it out a little better.


Stamped using China Glaze IDK using fauxnad image plates QA 17 (random stars on accent finger) and QA 18 (full size image of stars on rest of fingers).


I learned about these plates after either seeing KD image plates on Spellbinding's blog or getting an email from SarahLouise...can't remember now! The KD image plate seller had a few of the QA plates but when I was surfing ebay, I seen another seller more local (US) AND for a better price selling the whole set so ultimately, after asking if the seller would ship to me in Canada, I ended up buying them from here **. If you go to the bottom of the listing, you'll see better pix of all the plates. I've used these QA plates a few times since I got them (maybe five plates now) and any I've used work well. I picked up the XL K plate as well. I believe the listing indicates that there is no international shipping; however, I emailed and asked anyway...no harm in asking is always my motto! The seller agreed and for a reasonable price (under $6 I think). When I emailed back saying my order had arrived safe and sound, the seller replied indicating that international shipping will be considered if requested.


The plastic covering on these plates is a breeze to remove as well. The other great thing about this ebay seller is that they also have 20 of the A series image plates for $45. I think of how much I paid for them when they were only available from Europe...ouch!

This is how my package arrived...super cute eh? The seller even sent a couple extra image plates and stickers!


Have a fantastic New Year's Eve...regardless if you are like me and staying in or out revelling in the New Year!

All the best to you in 2012!!!

**Please note that I paid the invoiced amount in full for my plates. I do not endorse nor promote this website/etailer other than I am passing on the info of where I got them to those who may wish to know. I have no affiliation with any company and received no compensation for promotion of these products, nor am I promoting them...just letting fellow stamping addicts where they may be obtained should they be interested!