Wednesday, May 29, 2013

Previewing Big SdP Z

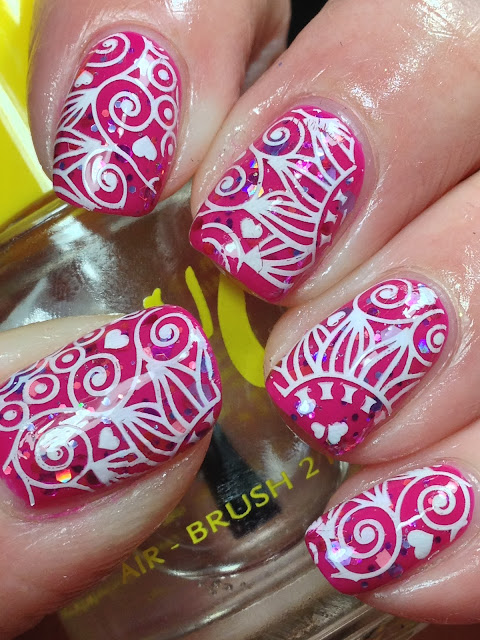
My order of the newly released Dashica plates arrived not too long ago; this is the first mani that I came up with using one of them, Big SdP Z.


After doing my regular base routine which also included two coats of NPB Glitter A-Peel (as I knew I'd be layering with glitter) started with two coats of Essie Bermuda Shorts.  This pix isn't accurate in colour; it is much brighter than shown here.  I've never used Bermuda Shorts before; I was surprised it dries matte...for some reason, I was expecting it to be a vibrant jelly!  No worries, thought, as I knew I was layering on top of it.


Added a coat of Emily de Molly Super Vixen; then layer of tc.  The pix is more accurate of the base of Bermuda Shorts as the glitter added is in a clear base; this was super bright....aka my kinda nails!


Stamped using white Konad special polish using Big SdP Z.


A few pix of Big SdP Z.

Love that this plate has so many inverted plate images like those squiggly lines; makes for some interesting mani's with accent nails!


The circled image is the one I used for this mani.  The image is a great size; I was able to place a portion of the design on each nail a little differently so each nail was unique which I did intentionally for a little interest.  On the ring finger, I even turned the design sideways and it still fit on my nail....lots of options which designs this large!


To finish the mani, topped with QD TC; used HongKong Girl this time.


When it came time to remove the mani, just peeled the nails off with an orange stick as I've shown before as I had used NPB Glitter A-Peel.


Dashica Beauty Shop products are available here.   

Thanks for looking!

Sunday, May 26, 2013

Blue and Gold

I haven't done my nails much this week as I'm either suffering from a cold or allergies.....or maybe even a little of both.  I did my nails last night for the first time in almost a week but will share another time; while I didn't really have the desire or energy to do them, they were looking a little worse for wear.   When I was in the midst of doing my nails, I was thinking I'm glad I took the time to do them as it kinda made me forget about being sick for a while.  Does that make sense?  Even if it doesn't necessarily make sense, it's how I felt none the less! This is a mani I wore in April just didn't get around to showing it.


For this mani, started with a base of two coats of Emily de Molly Stuffed Jeans, this has no topcoat. 


Thinking that gold stamping would compliment the gold glitter in Stuffed Jeans, stamped using CND Gold Chrome with an image from LLC B. This was at a time that my nails were fairly long and curvy and I used the XL squishy stamper to get right to the tips. I remember at the time thinking my squishy stamping use needs some practise as these lines are crooked as old anything....only to look at the image I was using to discover that in fact, the lines aren't straight to begin with! Whew! It hasn't met, it was the plate! I wouldn't be surprised if it was me though as straight lines are so hard to stamp; for me anyway!  I didn't line up the images very well either which makes some of the lines seem even more crooked!

In restrospect, I don't think this was the right stamping image for this mani but I've done worse so can't complain! lol!

Hope you're having a fantastic weekend; thanks for looking!


Tuesday, May 21, 2013

WingDust Lilacs in June

During a recent llarowe restock, I picked up a few WingDust Collections polishes including Lilacs in June, which I wore one day last week.  This is what I came up with.


Started with a base of two coats of WingDust Lilacs in June, topped with tc.


As described on llarowe, WingDust Lilacs in June is "a soft pink/purple base with a VERY shy lavender/aqua shimmer and loads of blue, purple, periwinkle and iridescent glitters.... the odd green holo might peek at you from time to time as well." 

This is gorgeous...and very spring-like!  The polish was sheer enough that there was a dimensional effect in the layering of the glitters; yet two coats provided good coverage. And ohhhhh, that shimmer!!!   It didn't seem that shy on my nails at all!


Bottle pix of WingDust Lilacs in June.


Stamped using white Konad special polish using SdP 104, which is part of the new plates that Dashica released not too long ago!


Topped with HKGirl topcoat.


This was another mani that I used the NPB Glitter A-Peel and it peeled off no problems.  I only wish I had have taken a few pix out in the daylight with some lilacs, which are in full bloom in my area now as they would have been the perfect backdrop for this mani!

Thanks for looking!


Sunday, May 19, 2013

NPB Glitter A-Peel

Recently, a couple new products came on the market to assist with glitter removal.  One was piCture pOlish Revolution, which I've bought but have yet to try; the other is Nail Pattern Boldness Glitter A-Peel that I decided to try with my last glitter mani for bling week.


While piCture pOlish Revolution makes the removal with a cotton ball and removal easier, NPB Glitter A-Peel is peeled off.  After doing some research on the way it's used on the NPB blog here, on bare nails, I layered two coats of NPB Glitter A-Peel on my nails.  I then did my normal base routine which in my case is one coat of Sally Hansen Nail Quencher and one coat of Instant Artificials.  Continued with my mani as normal, which was two coats of OPI Dazzled by Gold, two coats of Lynnderella Change, one coat of Gelous, one coat of Hongkong Girl topcoat, then stamped and finished with a last coat of Hongkong Girl topcoat.  This is what the mani looked like.


For removal, I won't lie, I was a bit skeptical of taking an orange stick to my nails and trying to peel this glitter bomb off; I was especially concerned about damaging my nails or if an extreme amount of pressure was needed. But I did take an orange stick at the free edge and pushed ever so slightly.  To my surprise, it popped up with no real force or issue.


Pushed it a little more ....


....then it popped right off.  No effort at all!


This is another finger but the glitter pops right off like this.


This pix, you can see the whole glitter part literally popped off.  This pix is right after the polish peeled off; no cleanup.


This is what NPB Glitter A-Peel looks like.


I've used Nail Pattern Boldness Glitter A-Peel several times now and haven't had any problems.  I've had the odd time that a little bit of the glitter doesn't peel off in full, but I just used remover and a cotton ball and cleaned it up.  I have to say that I find this is so much easier than the foil removal method or covering with the rubber finger things and waiting.  While they both work well, I find that the remover dries out my nails that already tend to be so dry plus there is the five to ten minutes that they need to work.  Sometimes, even then, the glitter doesn't all come off so I end up having to remove with a cotton round and remover and scrubbing anyway.  But I must say, this worked like a breeze and will be my go to glitter removal method in the future.  That is, unless I find pp Revolution works better!  This has definitely changed how often I wear glitter; while I've always loved wearing it, I usually space it out to give my nails a break because of the removal issues - but no more! 

NPB Glitter A-Peel ** is available via llarowe or NPB's Etsy store.  Both ship internationally!

Hope you're having a great weekend; thanks for looking!

**I paid for my bottle of NPB Glitter A-Peel; these are my thoughts and comments on the product!

Friday, May 17, 2013

Digit-al Dozen, Bling - Day 5

This is one of the blingiest combinations I've ever done on my nails so thought I'd do it again for Bling week!


Started with a base of two coats of OPI Dazzled By Gold; this pix has no topcoat.


Dabbed on two coats of Lynnderella Change; again no top coat. 


After adding a coat of Gelous and topcoat and waiting about 20 minutes for dry time (as at this point, between base coats, polish and everything else, I had 9 layers on my nails), stamped using black Konad special polish using Apipila P.07.  Even with fast dry topcoat and waiting, I still had a little polish squish out from the sides when stamping.


Finishing it off with a coat of topcoat; using Hongkong Girl fast dry topcoat.


Here's the rest of the ladies Day 5 Bling mani's if you'd like to check them out!


Hope you have a fantastic weekend; thanks for looking!


Thursday, May 16, 2013

Digit-al Dozen, Bling; Day 4

Does this look blingy?  Struggling with the theme of bling, I googled bling to see the definition and to make sure I'm following the theme; in the process, seen bling means flashy too; I think the holo in this mani is pretty flashy...so decided to post this mani as part of bling week!


Started with a base of Jade Holografico Uau! two coats, no topcoat.  This is a polish I lemmed for so long!  I missed a couple restocks on llarowe and I thought I'd never have it in my stash but was able to snag it eventually one of them!  I adore this polish; can't wait to do some Halloween/fall mani's with it several months from now too! I've since picked up a few other orange holo polishes; I could do a comparison some time but don't think I'd have anything to add from what The Crumpet mentioned/compared here.


The first mani that came to mind when I had this polish on was the stamped butterfly wing design.  I'd never used this design before and going over my stamping plates, there are a few different butterfly wing options. 

Apipila 03


NailCraze 01


Vivid Lacquer 002 and 004.


I looked at them all and was trying to figure out what plate(s) would work best for my nails as well as trying to figure out how best they should be placed.  It was a bit of a challenge to be honest; some of the large designs looked too big even for my largest nails but the smaller images, too small for the larger nails like the thumb and middle. After some analysis, I ultimately decided to use the NailCraze plate.  Even when it was stamped, it seemed a little on the large size for my nails or I lined it up wrong, who knows.  Anyway, here's what it looked like after stamping.


Not perfect by any means.  But no worries!  Grabbed a fine brush and just painted in the lines and filled where I thought it should be!


Another pix with different lighting.


Added assortment of white dots with a dotting tool using white Konad special polish. 


I had been given a bottle of HongKong Girl topcoat by one of my local supply places.  It was mentioned by a gal on one of the boards that it dries pretty fast, has high gloss finish, no shrinkage or image smear issues with stamping, so I thought I'd try it.  I must say that I've been sampling it for a few mani's since and haven't had any smear issues nor any shrinkage that I can recall.  But I rarely do anymore with SV either.  I don't think it dries quite as fast as SV but any difference was minimal.


I wore this mani for a few days; here's a pix later when I was outside. These pix look a little better as less black stamping polish at the cuticles lol!


A rare pix of my right hand; for this hand, I used the Apipila plate.


I must say that this mani was very eye catching and flashy; I got a lot of compliments during the time I was sporting these butterfly wings.  This is sure to be a mani I'll be doing again; and maybe then, I'll have figured out how to place the wing stamping a little better...or I'll be filling in with a brush again!

Here's the other ladies Day 4 mani's!


Thanks for looking!